Watch: the Security page
Threat detection, users and authentication, passkeys, and event logging. The written steps are below.
Security Overview
WolfStack provides a complete security layer for your infrastructure — from user authentication with two-factor authentication to firewall management, encryption, and brute-force protection.
🛡️ Fleet Security
A dedicated Fleet Security page in the sidebar concentrates every security action that runs across the entire cluster — one click, every node. Every control closes a real-world attack class at the kernel level rather than just logging it.
Emergency root password rotation
Rotates the root password on every node in the cluster from one button. Propagates via the cluster secret; results surface per-node (which succeeded, which were unreachable). Use after suspected compromise.
Brute-force lockout (kernel-level)
Failed logins (web UI + sshd + pvedaemon) trigger an IP lockout via iptables -j DROP. The attacker sees no response — the server appears not to exist. Default 48h lockout, configurable per-cluster. Propagated to every other node automatically so a banned IP is banned everywhere.
Force-logout all sessions
Invalidates every session cookie on every node in one click. Combined with a password rotation, this is the “the keys are burned” button.
Outbound scan detector
Samples /proc/net/tcp every 15s for SYN_SENT connections. Threshold-based: if the same UID opens N+ outbound connections to N+ distinct destinations inside the window, the process is killed and the UID is iptables-blocked. Hard safety: never kills PID 1 or wolfstack itself. UID 0 not auto-blocked.
Workload audit (containers + VMs + Docker)
Enumerates every LXC container, Proxmox CT, Docker container, Proxmox VM, and libvirt VM on every node. Flags --privileged, docker.sock mounts, --network=host, and other elevated-risk configurations. Catches the most common “container escape” setups.
Cluster secret rotation
Rotates the inter-node authentication secret on every node simultaneously. Used when the secret may have leaked (Git history, screen-share, ex-employee laptop). Atomic across the cluster.
Every action prefixes alerts with [cluster-name] hostname so multi-cluster operators know exactly which infrastructure the alert came from. Failed/unreachable nodes are surfaced by name (not just a count) so “14 nodes, 1 unreachable” tells you which one.
🧙 Gandalf
Every stronghold needs a gatekeeper who answers to no rulebook. Light the beacon and Gandalf takes the threshold of your fleet — watchful, unseen, and entirely uninterested in explaining himself.
Those who come with ill intent find the road closed. Those who belong pass without ever knowing he was there. There are no rules to write and no dials to turn; how he tells friend from foe is his own counsel, kept well beyond the reach of prying eyes — including, by design, our own documentation.
“You shall not pass” — to anyone he doesn’t care for. Light the beacon from WolfStack’s Security settings; that is all that is asked of you.
🦠 Antivirus & On-Access Scanning
Every node gets a built-in antivirus + rootkit stack — ClamAV for malware signatures, rkhunter and chkrootkit for rootkit indicators. WolfStack installs them on demand, runs them on a schedule, surfaces findings into the Security page, and auto-quarantines confirmed hits. No external SIEM required.
What's installed and what each tool does
- ClamAV — signature scan of the whole host filesystem. Walks
/, skips/proc,/sys,/dev, network mounts (NFS / CIFS / FUSE / S3FS / overlay / tmpfs), and live VM disk images. Streams progress so the operator sees the current file being scanned, not a frozen "scanning…" message. - clamonacc + clamd (on-access) — real-time scanning via fanotify. New files written to any watched mount get scanned the moment they're closed. Findings appear in the Security page within seconds. WolfStack manages the clamd.conf block (markers
WolfStack on-access begin/end), discovers non-local mounts on every apply so a freshly-attached NFS share is honoured without restarting. - rkhunter — rootkit hunter. Distro-aware false-positive filtering so legitimate package files don't drown out real findings.
- chkrootkit — second-opinion rootkit scan. Runs alongside rkhunter; their findings are de-duplicated.
Auto-actions: quarantine, kill, alert
- Auto-quarantine — confirmed ClamAV hits get moved to
/var/quarantine/wolfstackimmediately. Files are preserved (for forensics, AV vendor reporting, or restore) but no longer executable. One-click restore for false positives. - Auto-kill — when a hit is currently running as a process, WolfStack sends SIGTERM then SIGKILL. Configurable per node — some operators prefer "alert only" on the first hit and review before killing.
- Cluster-wide propagation — one node's finding fans out to peers via the cluster secret. An IP hash detected as a crypto miner on
node-1is alerted on every node in the cluster within seconds. - Private-channel alerts — findings go to email + Discord / Telegram / Slack. Never auto-posted to the public status page — threat intel about your hosts must not leak to anonymous viewers.
🛠 Repair ClamAV button
On every node's Security page, next to the scan button, the 🛠 Repair ClamAV button runs the heal flow manually with a step-by-step log:
- Checks that the
freshclambinary exists — surfaces a clear "installclamav-freshclam" message if not. - Ensures the
clamavsystem user exists (auto-creates it viaadduser --system --groupon Debian if missing — partial-install state is common after dpkg interruptions). - Stops the freshclam daemon to release the DB lock, runs
freshclamonce to seed signatures, then re-enables the daemon for future auto-updates. - Verifies that
/var/lib/clamavnow contains a usablemain.cvd/cld— surfaces a clear failure message naming the likely cause (firewall blocking outbound HTTPS todatabase.clamav.net, DNS broken, perms wrong) when the seed fails.
Same flow runs automatically when a scheduled scan hits "No supported database files" — the auto-recovery used to be silent on failure; now the actual reason surfaces into the last-scan error so you see why recovery didn't take. On-access enable also pre-seeds signatures before starting clamd, so the cascade where clamd refuses to start → clamonacc dies is impossible by construction.
Startup self-heal
WolfStack re-asserts the antivirus dependencies on every startup, matching the LXC bridge / WolfNet route / WolfRouter config pattern:
- If
/etc/logrotate.d/clamav-freshclamexists but theclamavuser doesn't, recreates the user so the daily logrotate run stops failing. Silent on healthy hosts — no operator action required. - Resumes the on-access log tailer if it was previously enabled (clamonacc keeps running across a WolfStack restart as a systemd service, but the in-process tailer doesn't — this re-attaches it).
Scheduling and scope
- Per-node schedule (every N hours) — each host scans its own filesystem; no leader-election or shared queue.
- Default exclude list covers virtual mounts and WolfStack's own quarantine + VM image stores. Custom exclude paths configurable in Settings.
- Fleet-wide scan button on the Fleet Security page — one click, every node, results stream back to the dashboard.
🚨 /tmp + /dev/shm Executable Detection
WolfStack's security scanner flags any running process whose executable resolves under /tmp or /dev/shm as a Compromise-class finding. These are the classic malware-staging paths — xmrig, fileless RATs, freshly-dropped reverse shells, post-exploitation toolkits. Legitimate software does not run from there.
- Reports PID, parent PID, command line, real user, resolved exe path (
readlink /proc/$PID/exe), file mtime / mode / size,fileverdict, and sha256 of the binary. - Open files + network sockets via
lsof -p $PIDwhen available — if it's mining, you'll see the pool TCP connection. - Never auto-kills (legitimate dev tools like pip, cargo, nix-shell drop short-lived helpers in
/tmp). Operator confirms; quarantine moves the binary to/var/lib/wolfstack/quarantine/with mode 000 (preserved as evidence, not deletable). /var/tmpand/run/user/*are intentionally out of scope — too many legit layouts share them./tmpand/dev/shmare the high-signal paths.
3-Strike Auto-Block & Federation Block Propagation
Repeated failed-login or attack signals against any node in the cluster trigger a kernel-level iptables -j DROP against the source IP — and that block then propagates to every other node in the cluster via the inter-node secret. An attacker brute-forcing SSH on the public-facing VPS can't pivot to a sibling node to try again.
- 3-strike threshold — three failed authentication events from the same source IP inside the lockout window trigger the auto-block. Tunable per cluster.
- Federation — the issuing node POSTs the block to every peer; peers apply it locally. A peer that was unreachable at block time learns about it on the next 10-second poll cycle so the gap is bounded.
- FORWARD-chain coverage — not just INPUT. Containers and VMs behind a node's bridge are protected against an IP banned at the cluster level, including LXC, Docker, and Proxmox CT/VM traffic. Pre-v23.12 the block lived only on INPUT, which meant a banned IP could still reach a published container port — fixed.
- Survives restarts — lockouts persist to disk and reload on startup. Restarting WolfStack doesn't reset the attacker's clock.
macvlan / ipvlan containers bypass the host's FORWARD chain by design (kernel feature). A future iteration will detect such containers and apply the DROP inside them via pct exec / docker exec — tracked as a Phase-2 item.
📨 In-App Abuse Reporting
When the scanner flags a confirmed attack source (SSH brute-force, credential stuffing, port scan, crypto miner C&C), WolfStack pre-fills an abuse report addressed to the source AS's registered abuse@ contact. The operator reviews the evidence (timestamps, observed activity, affected services) and presses Send.
- Operator-pressed Send is the only trigger. No scheduled batch send, no scanner-triggered auto-send, no “send if confidence > X” rule. Cross-border legal exposure, false-positive blowback, and the “sending email at 3am from your sponsor’s domain” failure mode make automation here non-negotiable.
- Locked at the code level. A build-time test fails if any code path can trigger an outbound abuse email without a signed operator action token. The constraint can't drift.
- Evidence is the report. The pre-fill includes raw log excerpts, source / destination IPs, UTC timestamps, affected services, and a cryptographic fingerprint of the WolfStack version that observed it — so the abuse desk receiving the report can verify provenance.
- Same rule for regulator filings + customer notification emails — ONLY on operator-pressed Send.
Authentication
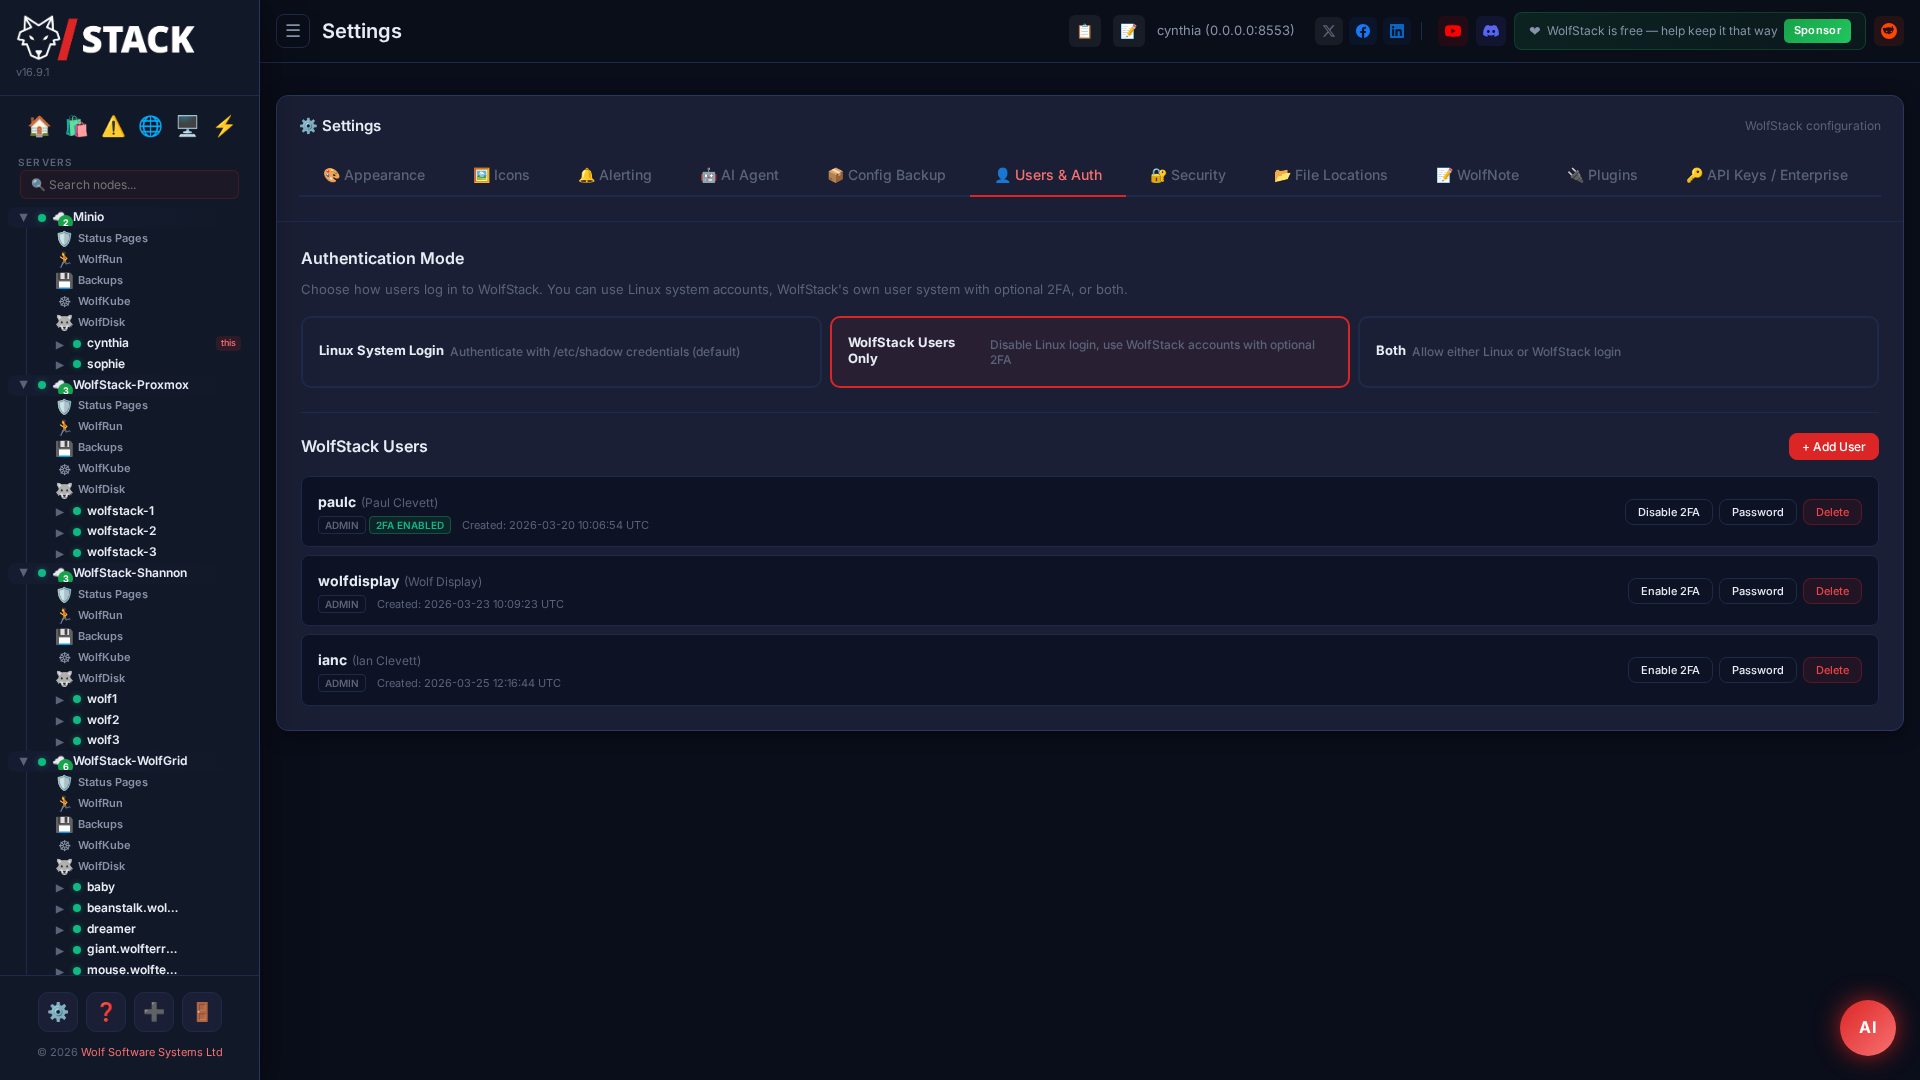
WolfStack supports three authentication modes, configurable from Settings → Users & Auth:
Linux System Login
Authenticate with your existing Linux user credentials via /etc/shadow. This is the default mode — any user on the server can log in.
WolfStack Users Only
Disable Linux login entirely. Only WolfStack user accounts can log in. Supports optional two-factor authentication (2FA) per user.
Both
Allow either Linux system credentials or WolfStack user accounts. WolfStack users are checked first.
WolfStack User Accounts
Create dedicated WolfStack user accounts with their own passwords, independent of Linux system users. Each user has:
- Username and password — passwords are hashed using SHA-512 crypt (same algorithm as Linux
/etc/shadow) - Role —
admin(full access) orviewer(read-only) - Display name — optional friendly name shown in the UI
- Two-factor authentication — optional TOTP-based 2FA per user
Managing Users
Go to Settings → Users & Auth to:
- Create new users with the + Add User button
- Change passwords for existing users
- Enable or disable two-factor authentication
- Delete users
User accounts are stored in /etc/wolfstack/users.json (configurable via Settings → File Locations).
Important: Before switching to WolfStack Users Only mode, create at least one WolfStack user account. Otherwise you will be locked out of the dashboard.
Two-Factor Authentication (2FA)
WolfStack supports TOTP-based two-factor authentication, compatible with:
- Google Authenticator
- Authy
- 1Password
- Microsoft Authenticator
- Any TOTP-compatible app (RFC 6238)
Setting Up 2FA
- Go to Settings → Users & Auth
- Click Enable 2FA next to a user
- Scan the QR code with your authenticator app (or enter the manual key)
- Enter the 6-digit code from your app to confirm
- 2FA is now active — the user will be prompted for a code on every login
Login Flow with 2FA
When a user with 2FA enabled logs in:
- Enter username and password as normal
- If the password is correct, a two-factor code input appears
- Enter the 6-digit code from the authenticator app
- Login is complete
Clock skew tolerance: WolfStack accepts codes from the current time step and ±1 step (30 seconds each way), so minor clock differences between your server and phone won’t cause issues.
Cluster Authentication
| Method | Purpose | Details |
|---|---|---|
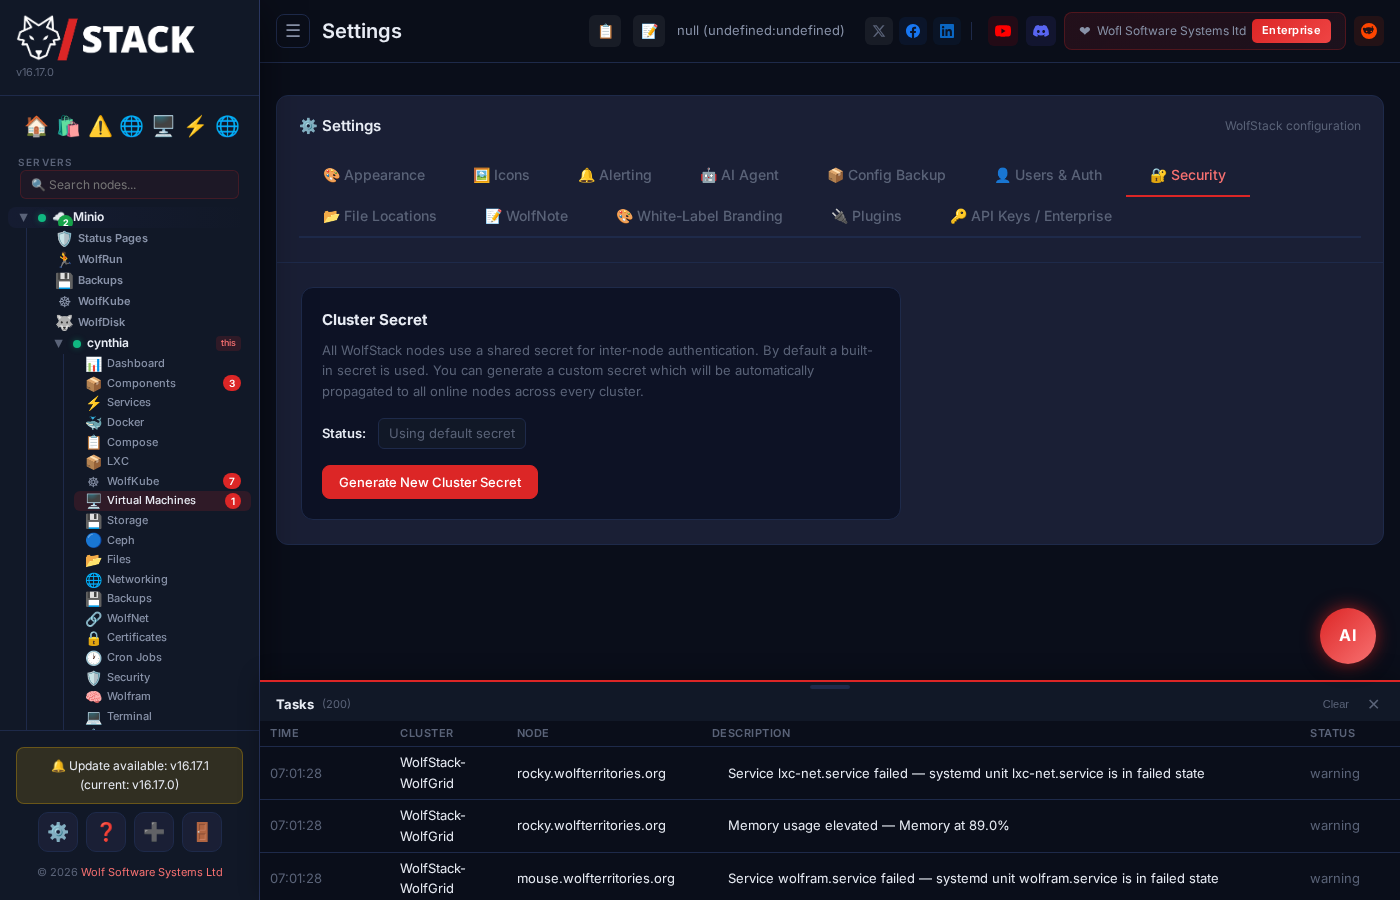
| Cluster secrets | Inter-node API auth | Shared secret sent via X-WolfStack-Secret header. Generate a custom secret in Settings → Security. |
| Join tokens | Adding new nodes | Per-node tokens for cluster join operations. View with wolfstack --show-token. |
| Session cookies | Browser sessions | 8-hour lifetime, HTTP-only, SameSite=Strict. Secure flag enabled when TLS is active. |
Login Protection & Kernel-Level Lockout
WolfStack unifies login protection across the WolfStack web UI, sshd, and Proxmox's pvedaemon. A single failed-login monitor watches all three; lockouts apply to every entrypoint at once.
- Kernel-level IP blocking — Repeated failed logins trigger an
iptables -j DROPrule. The attacker sees no response on any port; the server appears not to exist. Default lockout 48 hours, configurable per cluster. - Unified across entrypoints — Web UI, SSH, and Proxmox login failures all feed the same lockout. An attacker brute-forcing SSH can’t pivot to the web UI on the same node.
- Fleet propagation — A block on one node propagates to every peer automatically. An IP banned from
node-1is banned from every node in the cluster within seconds. - Survives restarts — Lockouts persist to disk and reload on startup, so a restart doesn’t reset the attacker’s clock.
- Session management — Sessions expire after 8 hours. Expired sessions cleaned up every 5 minutes. Operator can force-logout every session on every node in one click via Fleet Security.
- Disable direct login on secondary nodes — Force operators to access secondary nodes via the primary dashboard, eliminating direct attack surface.
Threat Intelligence Blocklists
Subscribe per-cluster to community-curated threat-intel feeds (FireHOL, Spamhaus DROP, Emerging Threats, etc.). Matched IPs are dropped at the kernel via ipset — one rule covers tens of thousands of malicious sources without slowing the netfilter chain.
- Off by default — You enable it explicitly per cluster. No silent blocking.
- Dry-run mode — Test which IPs would be blocked before promoting the list to live. Logs all hits without dropping packets.
- Typed-confirm promote — To switch a list from dry-run to live you type the list name. Prevents accidental blocking of a known-good range.
- Per-cluster scoping — Each cluster has its own active lists. A homelab cluster can run aggressive lists; a customer-facing cluster can run conservative ones.
- Cluster-wide divergence visibility — Surface when one node in a cluster has a different blocklist than the others (drift detection), with one-click sync.
- Honours WolfRouter active cluster — Operations run against the cluster you’re looking at, not a stale default.
CVE Inbox
WolfStack tracks the CVE feed for every package installed on every node and surfaces actionable advisories in a unified inbox.
- Grouped by exploit category — Remote code execution, privilege escalation, denial of service, info disclosure. Triage by impact rather than chronologically.
- Per-CVE upgrade commands — Each advisory shows the exact command for your distro’s package manager (apt / dnf / pacman / zypper / apk). No more guessing at vendor advisories.
- Affected-node breakdown — See which nodes in your cluster are vulnerable, which have already been patched, which are out of date on the cache.
- Severity filter — Default view hides “low” advisories. Focus on what could actually hurt you.
Predictive Compromise Detection
A background predictive analyzer correlates signals across logs, network state, process tables, and recent operator actions to flag indicators of compromise (IoCs) before they become incidents.
- Real-time signal correlation — Failed-login spike + new outbound destination + unexpected service start = elevated risk score. One signal alone may be noise; the combination usually isn’t.
- Auto-remediation policies — Optional “if predictive score crosses threshold X, do Y”. Y can be: alert only, lock outbound from that process, kill the process, reboot the node into rescue mode. You set the threshold and action per cluster.
- Audit trail — Every action the analyzer takes is logged with the signal evidence so you can validate it after the fact.
- Cluster-aware — Same compromise patterns on multiple nodes simultaneously escalate the alert severity automatically.
Passkeys (WebAuthn)
Replace passwords with hardware-backed passkeys for an unphishable login.
- Per-user enrolment — Each operator adds one or more passkeys (YubiKey, Touch ID, Windows Hello, iCloud Keychain) from Settings → Users & Auth.
- Resident-key support — Passkeys can be discoverable so login is one tap, no username typed first.
- Conditional UI — The login page auto-prompts for passkeys when the browser advertises support.
- Coexists with password + 2FA — Passkey login is one option; users without one fall back to their existing flow.
Firewall Management
WolfStack provides a web interface for managing Linux firewall tools on each node.
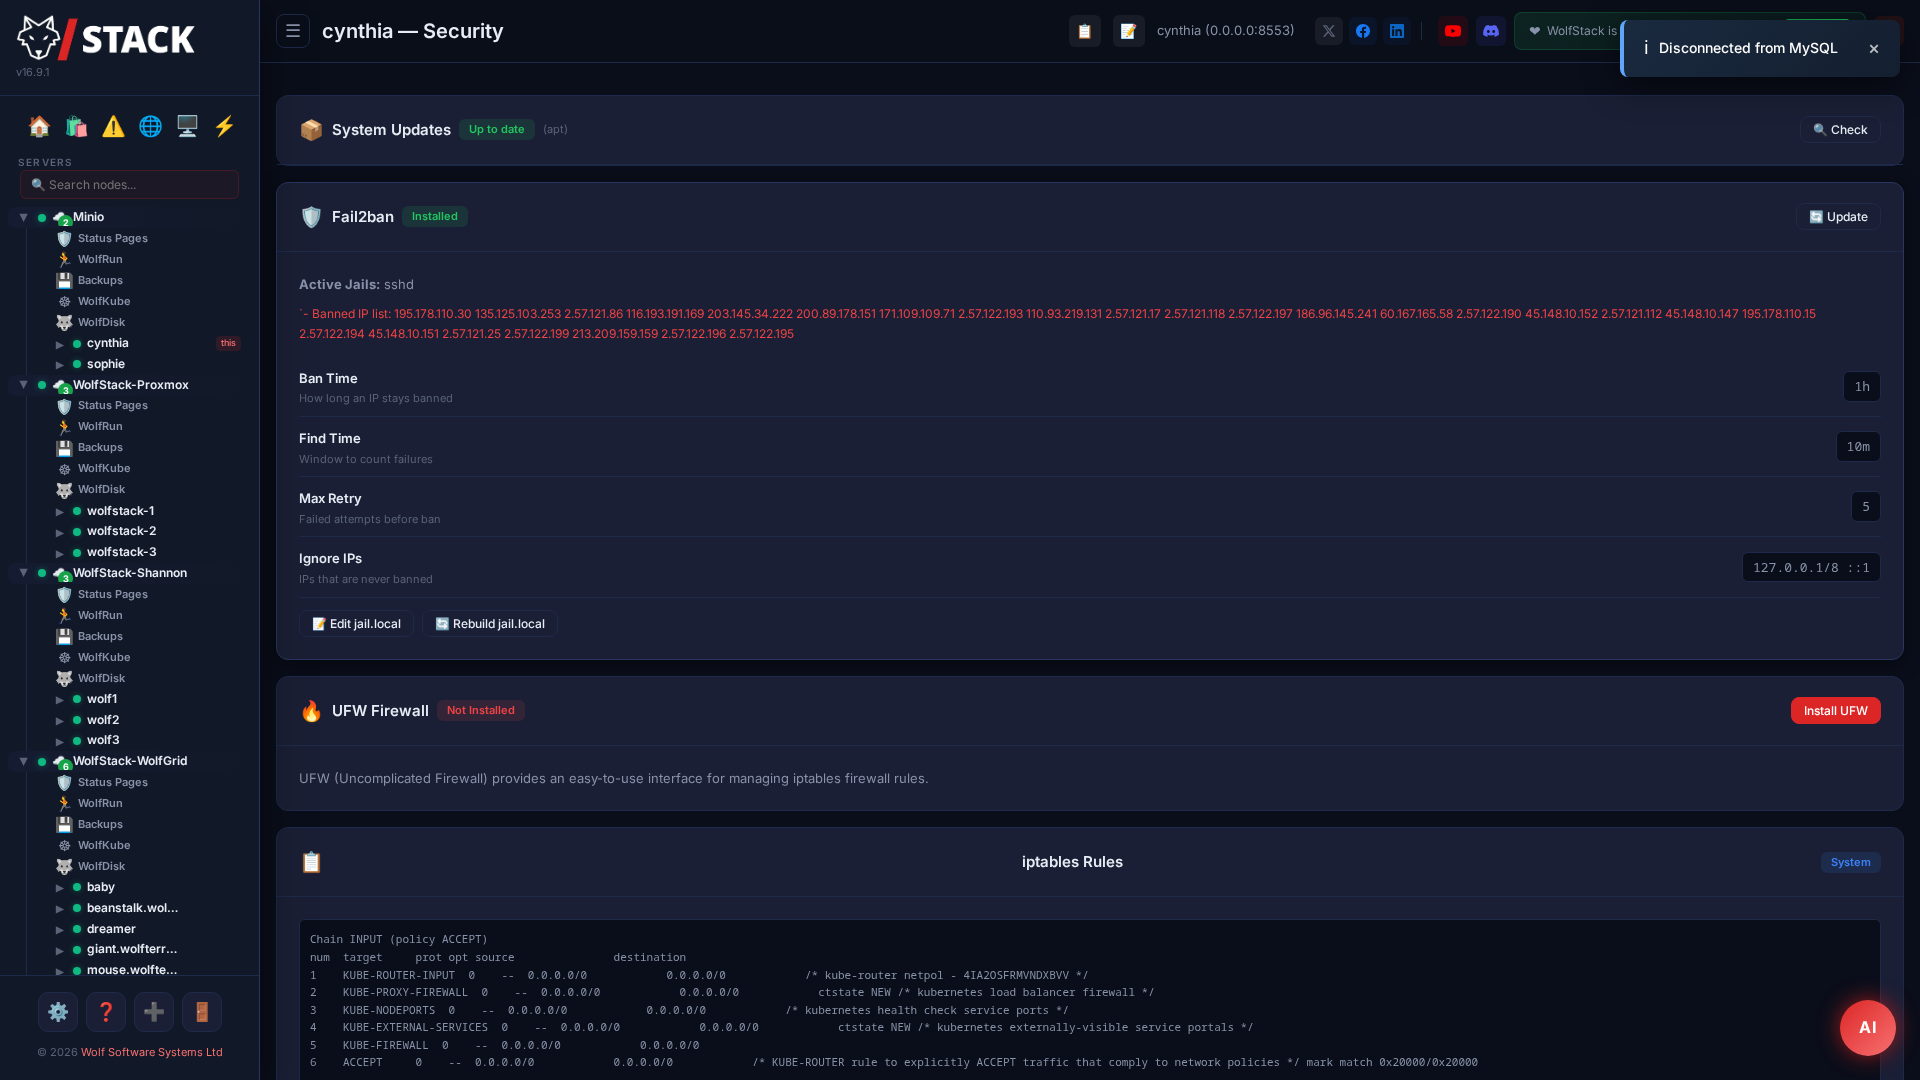
Fail2ban
- Install and configure Fail2ban from the dashboard
- View banned IPs across all jails
- Unban IPs with one click
- Rebuild configuration when needed
UFW (Uncomplicated Firewall)
- Enable or disable the firewall
- Add and remove rules (allow/deny by port, protocol, source)
- View all active rules
iptables
- View current iptables rules across all chains
- Read-only view for advanced users who manage iptables directly
Encryption
- WolfNet — All inter-node traffic is encrypted with X25519 key exchange and ChaCha20-Poly1305 symmetric encryption
- HTTPS — The dashboard uses TLS by default. Auto-detects Let’s Encrypt certificates or uses self-signed.
- Password storage — WolfStack user passwords are hashed with SHA-512 crypt (never stored in plaintext)
- TOTP secrets — Stored server-side in
/etc/wolfstack/users.json(root-only readable)
System Updates
- Check for available system package updates from the dashboard
- Apply updates across nodes individually or in bulk
- WolfStack itself can be updated via WolfFlow automation or the Issues page
AI & WolfAgents
Enabling AI in WolfStack — Settings → AI Agent, or any named WolfAgent — changes your threat model. The LLM sees untrusted text (chat messages, log tails, alert payloads) and can invoke tools. Here's what to do, not just what to worry about.
Pick the right access level
- Public-facing channel (Discord server, WhatsApp number, shared Telegram group) → start with
ReadOnly. Move toConfirmAllonly once you're sure the channel audience is trusted. NeverTrusted. - Private DM with an oncall engineer →
ReadWriteis usually right; mutating calls execute, destructive ones queue for your approval. - Self-authored automation agent you wrote the prompt for, reachable only from the dashboard →
Trustedis fine, but understand that the hardcoded safety denylist is the only remaining guard.
Narrow target scope — don't leave wildcards
- Fill in Allowed container patterns (
regions-*, app-*). Empty means "any container the agent can reach", which is usually wider than you think. - Fill in Allowed paths before granting
write_fileorschedule_script./home/wolfgrid1/assetcacheis a scope;/is an incident waiting to happen. - If granting the Enterprise
wolfstack_apitool, fill in Allowed API paths. A good starting set:/api/nodes, /api/containers, /api/metrics, /api/alerts. Never leave it empty. - If granting
send_email, fill in Allowed email recipients. Use@yourcompany.comto permit anyone on your team without naming each inbox, but don't leave it empty-with-default-recipient if the agent is reachable from an external surface (Discord server, WhatsApp number). Empty means "only the default alerting recipient", which is safe — but easy to widen by accident. - Scope Allowed clusters to staging first. Promote to production only after you've seen the agent behave for a week.
Web-reaching tools have their own risks
web_fetchandweb_renderare classified Safe, but "safe" here means "won't mutate your cluster" — the agent can still exfiltrate what it has already read by encoding state into a query string. If an agent hasread_logandweb_fetch, treat it as if its memory is exposed to any URL it fetches. Don't enable both on an agent reachable from untrusted chat.- Block outbound egress at the firewall for nodes that don't need it — the SSRF guard stops private-address fetches, but has no opinion on
https://pastebin.com/api?data=.... web_rendershells out to headless Chromium. Install chromium only on nodes where you want this tool live; the absence of the binary is already a working "disabled" switch on the others.
Grant the minimum tool set
- New agents start with no tools ticked — keep it that way until the agent proves it needs a specific tool. Don't tick "all of them" to avoid debugging later; that's how a triage agent ends up with
exec_on_host. - Review the Audit tab weekly. Tools the agent never uses should be untickened. Tools the agent uses suspiciously often (10x
exec_in_containerin an hour) are a prompt-injection indicator. - Pair
exec_*tools withConfirmAllunless you've already narrowed target scope to the point where the worst case is acceptable.
Treat external channels as hostile input
- Discord Message Content intent — only enable if you want the agent to actually read messages. A bot with the intent disabled sees only mentions and commands; that's a safer default for shared servers.
- Telegram receiver is opt-in per install (Settings → Alerting → Enable Telegram receiver). Leave it off on installs that only need outbound alerts.
- Twilio webhook for WhatsApp is HMAC-SHA1 signed — rejected requests never reach the LLM. Don't expose the webhook URL on the public internet beyond what Twilio's egress IPs need; put it behind your reverse proxy with an IP allowlist if you can.
- Log tails and alert payloads are untrusted too. An agent with
read_logcan be steered by text an attacker injects into an app log. If an agent reads logs, it should not also have unconfirmed mutating tools.
Rotate secrets like you rotate SSH keys
- AI provider API keys (Anthropic, Gemini, OpenRouter) live in Settings → AI Agent. Rotate them when an operator leaves, after any leak suspicion, or at least every 90 days. WolfStack stores them write-only; the UI never echoes them back.
- Discord bot token and Twilio auth token — same rule. API exposes only
has_discord_bot/has_twilio_authbooleans, so rotating is safe. - Cluster secret — the universal
wolfstack_apitool authenticates loopback calls with it. Rotate on incident (Settings → Security → Regenerate), then re-pair your nodes.
Keep prompts and memory private
- Memory and audit logs live at
0o600in/etc/wolfstack/agents/<id>/with directories at0o700. If you have untrusted local users on a WolfStack host, don't put them in thewolfstackgroup. - Tell users not to paste production secrets into agent chats. Memory is append-only — a secret typed once lives forever in the file. If it happens, rotate the secret and
rmthe specific memory file (the agent starts fresh). - For sensitive workloads, run a local model (Ollama / LM Studio / vLLM) instead of a cloud provider — chat payloads never leave the host.
The safety denylist is a floor, not a ceiling
- WolfStack hardcodes denies for
rm -rf /, disk wipes, firewall flushes, curl-pipe-bash, and access to/etc/shadow,/etc/passwd,/boot, and WolfStack's own config. These apply above access level — even a Trusted agent can't bypass them, and an operator can't approve around them. - Do not assume the denylist covers every footgun. Combine it with narrow scope (above) and
ConfirmAllfor anything reachable from outside your team. - If you find a novel attack the denylist doesn't catch, file an issue — the list grows when we see real incidents, not on request.
Monitor
- Pending tab should be empty or small. A growing queue means the agent is attempting things it shouldn't — read them before approving.
- Audit tab — skim weekly. A tool repeatedly being called then denied is the signature of prompt-injection attempts.
- AI provider usage dashboard — a sudden spike in tokens from one agent is worth investigating, especially if it's on a public channel.
Best Practices
- Switch to WolfStack Users Only mode and enable 2FA for all users
- Generate a custom cluster secret in Settings → Security
- Enable Fail2ban to automatically ban brute-force attackers
- Use UFW to restrict access to only required ports
- Use WolfNet to keep management traffic off the public internet
- Keep WolfStack updated to the latest version
- Disable direct login on secondary nodes — manage them through the primary dashboard