Watch: backing up and restoring
Selecting workloads, choosing a destination, scheduling, and restoring. The written steps are below.
Overview
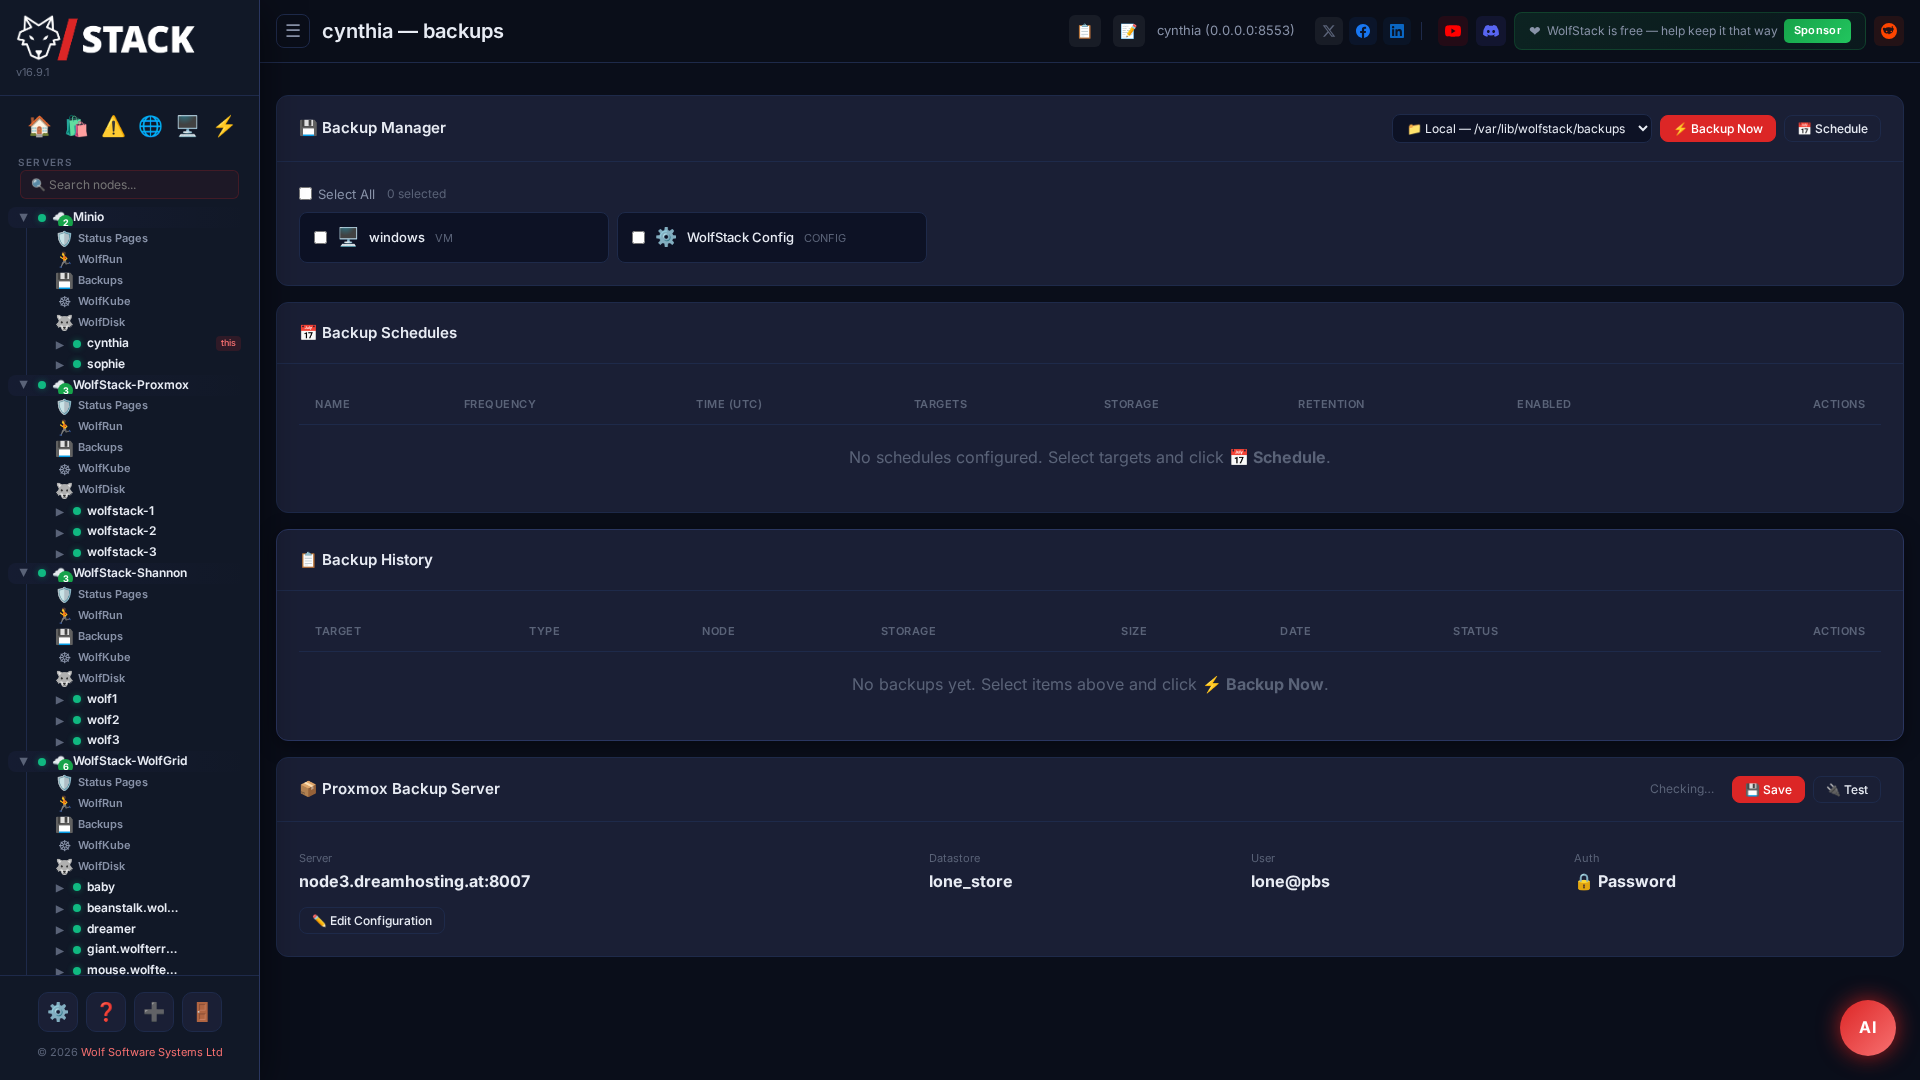
WolfStack’s Backup & Restore system lets you create on-demand or scheduled backups of everything on your server — Docker containers, LXC containers, KVM virtual machines, and WolfStack configuration files. Backups can be stored locally, on S3-compatible object storage, over NFS, over SMB/CIFS (Synology, QNAP, Windows file servers), on a remote WolfStack node, on a WolfDisk mount, or on a Proxmox Backup Server (PBS).
Per-node backups are accessed under each node → 💾 Backups. For a cluster-wide view, see Cluster Backups under your cluster name in the sidebar.
What Can Be Backed Up
| Target Type | What’s Included | Method |
|---|---|---|
| Docker Container | Full container filesystem plus all named volumes and bind mounts (committed image + tar of every volume + gzip) New | docker commit + per-volume tar → gzip |
| LXC Container | Entire /var/lib/lxc/{name}/ directory (rootfs + config) | tar czf (container is stopped briefly for consistency) |
| KVM/QEMU VM | Disk images (.qcow2), config JSON, logs, extra volumes | tar czf (VM shut down via ACPI for safe snapshot) |
| Configuration | All /etc/wolfstack/ and /etc/wolfnet/ config files, VM configs | tar czf |
Storage Destinations
When creating a backup or schedule you choose where to store the resulting archive. WolfStack supports seven destination types:
Local Path
Store backups in a directory on the server’s local filesystem. Fast and simple — good for quick snapshots or when combined with an external mount.
/var/backups/wolfstackS3-Compatible Object Storage
Upload backups to any S3-compatible bucket — AWS S3, Cloudflare R2, MinIO, Wasabi, Backblaze B2, etc. Backups are stored under the wolfstack-backups/ prefix inside the bucket.
| Field | Description | Example |
|---|---|---|
| Bucket | Bucket name | my-backups |
| Region | AWS region or custom region string | eu-west-1 |
| Endpoint | S3 endpoint URL (leave blank for AWS) | https://s3.eu-west-1.amazonaws.com |
| Access Key | IAM access key ID | AKIA... |
| Secret Key | IAM secret access key | wJal... |
NFS Share
Write backups directly to an NFS export — no separate Storage mount required. WolfStack mounts the share idempotently at /mnt/wolfstack-backup/nfs-<sanitised-source>/ on first use and reuses it for subsequent backups.
| Field | Description | Example |
|---|---|---|
| Source | server:/export | nas.local:/volume1/wolfstack |
| Options | Mount options (defaults to rw,soft,timeo=50) | rw,hard,sec=sys |
SMB/CIFS Share (Synology, QNAP, Windows)
Write backups directly to an SMB share. Consumer NAS boxes default to SMB on Windows networks — this is the easiest path to a Synology or QNAP without enabling NFS.
| Field | Description | Example |
|---|---|---|
| Source | //server/share (or \\server\share) | //nas.local/wolfstack |
| Subpath | Optional subdirectory under the share root | backups/cluster-a |
| Username | SMB user (blank for guest) | backupuser |
| Password | SMB password | … |
| Domain | AD domain / workgroup (optional) | WORKGROUP |
| Options | Extra CIFS options (defaults to SMB 3.0) | vers=2.1 for older NAS |
cifs-utils or nfs-common isn't installed on the host, WolfStack pops a confirm dialog at save time and runs the install in a live terminal window. Nothing installs silently.Remote WolfStack Node
Send backups to another WolfStack node’s import endpoint. Useful for off-site replication across your cluster. Provide the full URL of the remote node (e.g. https://10.0.10.2:8553).
WolfDisk
Store backups on a WolfDisk distributed filesystem mount. Works exactly like local storage but the data is replicated across WolfDisk nodes automatically. Specify the mount point path (e.g. /mnt/wolfdisk/backups).
Proxmox Backup Server (PBS)
Send backups to a dedicated Proxmox Backup Server. This is the recommended option if you already run PBS in your infrastructure — you get deduplication, encryption, and a proven backup pipeline. See the Connecting to Proxmox Backup Server section below for full setup instructions.
Creating a Backup
- Go to Datacenter → Backup in the WolfStack dashboard
- The Targets panel lists every Docker container, LXC container, VM, and a “Config” entry. Tick the items you want to back up, or use Select All.
- Choose a Storage Destination from the dropdown (local path, S3, remote node, WolfDisk, or PBS — if configured).
- Click Backup Selected. A progress indicator shows each item being backed up in real time.
- Completed backups appear in the Backup History table with their size, date, status, and storage location.
Restoring a Backup
- In the Backup History table, find the backup you want to restore.
- Click the Restore button on that row.
- Confirm the restore in the dialog. WolfStack will download the archive from storage (if remote) and restore it to the appropriate location:
- Docker — loads the image back into Docker (
docker load). You can then create a new container from it. - LXC — extracts the rootfs and config to
/var/lib/lxc/, fixes paths and permissions automatically. Start it from the Containers page. - VM — extracts disk images and config to
/var/lib/wolfstack/vms/. The VM appears in the dashboard and can be started. - Config — restores all WolfStack and WolfNet configuration files. Restart WolfStack to apply.
- Docker — loads the image back into Docker (
Backup Schedules
Automate your backups with schedules. Each schedule defines what to back up, how often, where to store it, and how many copies to keep.
Creating a Schedule
- In the Backup page, open the Schedules panel.
- Click Add Schedule.
- Configure:
Field Description Name A descriptive name (e.g. “Nightly full backup”) Frequency Daily, Weekly, or Monthly Day of the week New in v25.16 Weekly schedules only. Which weekday the backup runs on (Monday–Sunday). Day of the month New in v25.16 Monthly schedules only. Which day of the month (1st–31st). A day the month doesn’t have runs on that month’s last day — the 31st backs up on 28/29 February, never skipping a month. Time Time of day to run (HH:MM, 24-hour format) Retention Number of backups to keep (0 = unlimited). Oldest backups are pruned when the limit is reached. Backup All Back up every target on the server, or select specific items Stop each container for a cold backup New in v25.16 Shown when Backup All is on. Stops every Docker/LXC container while it is archived and restarts it afterwards, for a fully consistent (quiesced) archive instead of a crash-consistent one. When you pick items individually, use each container’s own Stop container for cold backup tick instead. Proxmox LXC ignores it — vzdump snapshots there. Storage Choose a storage destination (same options as manual backups) Enabled Toggle the schedule on or off without deleting it - Click Save. WolfStack checks for due schedules every 60 seconds.
Staging space New in v25.16.1
Every archive is built in the backup staging directory before it ships to its destination, so staging needs room for the whole thing. WolfStack now measures the target first — a container's image plus its volumes and binds, a container or folder tree, a VM's disk images — and refuses the backup if the staging filesystem can't hold it, naming both figures and leaving nothing written. Previously a large container could fill the system drive, fail, and leave its partial archive behind.
- Sizes are measured uncompressed, with a 1 GiB reserve for the rest of the system. No compression ratio is assumed, because media, encrypted volumes and already-compressed data don't compress at all — and a filled root filesystem is far worse than a refused backup.
- Mounts you excluded for a target are excluded from the measurement too, so excluding a large media bind lets the rest of the container back up.
- To give staging room, point Settings → File Locations → Backup Staging Directory at a disk with space. Keep it off
tmpfs— staging on a RAM-backed filesystem competes with the machine's memory.
Large mount warning New in v25.17
A container can be two gigabytes of application and twenty terabytes of bind-mounted array. WolfStack now checks the mounts a backup would include before it starts — both when you click Backup Now and when you save a schedule — and asks about any mount larger than 50 GB:
- Exclude these mounts — adds them to that target’s exclusion list and carries on with the rest of the container. This is the usual answer for a media library or a datastore.
- Include them anyway — proceeds unchanged. Mounts you have already excluded are never re-asked about.
- Cancel — nothing is started, and a schedule is not saved.
Sizes are established without making you wait: a mount that is a filesystem of its own is read from the filesystem itself, anything else is measured for up to five seconds. A mount too large to measure in that time is reported as size unknown with the ceiling its filesystem puts on it — being unmeasurable is itself worth knowing about before it goes into an archive. Proxmox storage-backed mountpoints show the size their config provisions.
Editing a Schedule New in v25.15
- In the Schedules panel, click the gear icon (Edit schedule) on the schedule’s row.
- Change the name, frequency, run day, time, retention, or pre/post hooks as needed.
- For an item schedule (containers, VMs, databases), tick or untick items in the picker. A scheduled item that isn’t in the current list — offline, on another node, or deleted — is kept as-is rather than silently dropped.
- For a folder schedule, the modal shows Folders in this schedule: remove a folder with its × button, or type an absolute path and click Add folder. Kept folders preserve their per-folder settings (such as mount exclusions), and a schedule can’t be saved with no folders left. Previously folder paths were locked once created — adding one meant rebuilding the schedule from scratch.
- Click Save. The schedule updates in place — its history and identity are kept.
Cluster Backups
Cluster Backups gives you a single aggregated view of all backups across every node in a cluster, plus the ability to push backup schedules and PBS configuration to multiple nodes at once — even across different clusters.
Access it from the sidebar under your cluster name → 💾 Backups (next to WolfRun and Status Pages).
Aggregated Overview
The cluster backups page shows:
- Summary stats — total backups, schedules, nodes, and how many nodes have PBS connected
- Backup History (All Nodes) — a combined table of every backup from every online node in the cluster, sorted newest first, with a Node column showing which server each backup lives on
- Schedules (All Nodes) — all active and disabled schedules across the cluster in one view
Creating a Cluster-Wide Schedule
Instead of configuring a backup schedule on each node individually, you can define one schedule and push it to multiple nodes at once:
- Go to your cluster → 💾 Backups → Create Cluster Schedule.
- Fill in the schedule settings (name, frequency, time, retention, storage).
- Choose what to back up:
- Everything on each node — each node backs up all its Docker containers, LXC containers, VMs, and config automatically.
- Select specific targets — click Load Targets from Nodes to fetch the available backup targets from each node. Targets are grouped by node with individual checkboxes, so you can exclude specific containers or VMs from certain nodes. Each node also has an All toggle.
- In the Target Nodes section, tick which nodes should receive the schedule. Nodes are sorted by cluster then hostname.
- Click Push Schedule to Selected Nodes. WolfStack creates the schedule on each selected node in parallel.
backup_all: true to that node. This means any new containers or VMs added later are automatically included. If you deselect even one target, only the explicitly checked items are backed up.Pushing PBS Configuration to All Nodes
If you use Proxmox Backup Server, you can configure it once and push the credentials to every WolfStack node — even nodes in different clusters:
- In the Proxmox Backup Server — Push Config card, enter your PBS details (server, datastore, user, password or API token, fingerprint, namespace).
- In the Target Nodes section, select which nodes to push to. All online WolfStack nodes across every cluster are listed.
- Click Push PBS Config to Selected Nodes.
Each node receives the full PBS configuration including passwords and secrets, so it can immediately start sending backups to PBS.
Pulling PBS Configuration from a Node
If PBS is already configured on one of your nodes, you can pull that configuration and use it to push to other nodes:
- Click Pull Config from a Node.
- A dialog shows every online WolfStack node and whether it has PBS configured (with the server and datastore name).
- Click Pull next to the node you want to copy from. The full config (including passwords and token secrets) is fetched and populated into the form.
- You can then push it to all other nodes.
Per-Node PBS Status
The cluster backups page shows the PBS connection status of every node in your cluster at a glance — whether the client is installed, whether it can reach the PBS server, and how many snapshots are available. This makes it easy to spot nodes that need attention.
Connecting to Proxmox Backup Server (PBS)
Proxmox Backup Server is a dedicated backup solution with deduplication, compression, and encryption. WolfStack integrates directly with PBS — you can send backups to it and restore snapshots from it, all from the WolfStack dashboard.
Prerequisites
- A running Proxmox Backup Server instance (can be on the same network or reachable over the internet)
- The
proxmox-backup-clientis already installed automatically by the WolfStack setup script — no extra installation needed - A PBS user and API token (or password) with access to a datastore
Step 1 — Create a PBS API Token
- Log in to your Proxmox Backup Server web interface (default:
https://your-pbs:8007). - Go to Configuration → Access Control → API Tokens.
- Click Add and create a token:
- User: e.g.
backup@pbs - Token Name: e.g.
wolfstack - Privilege Separation: Untick this so the token inherits the user’s permissions
- User: e.g.
- Copy the Token Secret — it is only shown once.
- Ensure the user has DatastoreBackup and DatastoreReader permissions on the target datastore.
Step 2 — Get the Server Fingerprint (Optional)
If your PBS uses a self-signed certificate you need its TLS fingerprint so WolfStack can verify the connection.
# Run on the PBS server itself:
proxmox-backup-manager cert info 2>/dev/null | grep Fingerprint

# Or from a remote machine:
openssl s_client -connect your-pbs:8007 < /dev/null 2>/dev/null \
  | openssl x509 -fingerprint -sha256 -noout
Step 3 — Configure PBS in WolfStack
- In the WolfStack dashboard, go to Datacenter → Backup.
- Open the Proxmox Backup Server panel.
- Fill in the connection details:
Field Description Example PBS Server Hostname or IP of your PBS 10.0.10.50orpbs.example.comDatastore Name of the PBS datastore to use mainUser PBS user account backup@pbsToken Name API token name (leave blank to use password auth) wolfstackToken Secret The token secret you copied earlier xxxxxxxx-xxxx-xxxx-xxxx-xxxxxxxxxxxxPassword Alternative to token auth — the user’s password Fingerprint TLS fingerprint (required for self-signed certs, optional otherwise) AB:CD:EF:...Namespace PBS namespace for organizing backups (optional) wolfstack - Click Save & Test Connection. WolfStack connects to PBS, verifies credentials, and reports how many existing snapshots it found.
Step 4 — Send Backups to PBS
Once PBS is configured, it appears as a storage destination in the backup dropdown:
- Select your backup targets (containers, VMs, config).
- Choose PBS — your-server/datastore from the storage dropdown.
- Click Backup Selected.
WolfStack uses proxmox-backup-client under the hood to upload archives to PBS. The repository string is automatically constructed from your configuration:
# With API token:
backup@pbs!wolfstack@10.0.10.50:main

# With password:
backup@pbs@10.0.10.50:main
You can also include PBS as the storage destination in a scheduled backup for fully automated off-site backups.
Step 5 — Restore from PBS
- In the Proxmox Backup Server panel, click Browse Snapshots.
- WolfStack fetches the snapshot list from PBS and displays them with their date, size, and type.
- Click Restore on the snapshot you want. WolfStack downloads it using
proxmox-backup-client restoreand extracts it to the appropriate location on the node. - A live progress indicator shows the download and restore status.
File-Level Backups (pxar) — Restore Single Files in PBS
By default, WolfStack uploads each backup to PBS as a single archive — restorable only as a whole. Tick File-level (pxar) in the PBS settings (or override it per backup) and applicable targets are instead uploaded as native pxar archives: PBS can then browse the snapshot’s file tree in its own web UI and restore a single file from any snapshot — no downloading and unpacking a whole tarball to grab one file from two days ago.
File-level applies to:
- Docker containers — the container filesystem plus its volumes/binds, each as its own archive.
- Native LXC containers — the live rootfs directory.
- System folders — the folder itself (folder exclusions are honoured as pxar patterns).
- WolfStack config backups — the full config tree (
/etc/wolfstack,/etc/wolfnet,/etc/wolfusb, VM configs), so you can inspect or pull back a single config file from any point in time. Snapshots are per-node (host/wolfstack-config-<hostname>), so several nodes can share one datastore cleanly.
VMs (disk images, not file trees) and Proxmox LXC (block-backed rootfs) can’t use pxar — the backup log states this explicitly and falls back to the image archive, so a .tar.gz is never mistaken for a broken feature. Every backup’s live log prints one line stating the resulting format and why.
WolfStack’s own restore of a file-level snapshot extracts the complete tree (for config backups it applies the same same-machine / new-machine rules as tarball restores); per-file restore is what the PBS web UI is for.
Backing Up Proxmox VE Guests
If you have Proxmox VE nodes added to your WolfStack cluster, their VMs and LXC containers are visible in the dashboard. However, WolfStack’s built-in backup system backs up workloads running on the WolfStack node itself (native Docker, LXC, and KVM/QEMU VMs).
For Proxmox VE guests, the recommended backup strategy is:
- Use PBS for PVE guests — Configure Proxmox Backup Server as a storage target in both Proxmox VE and WolfStack. PVE handles its own guest backups natively with vzdump, while WolfStack backs up its local workloads to the same PBS.
- Restore PVE guests via WolfStack — WolfStack can browse PBS snapshots and trigger restores of vzdump archives back to a Proxmox VE node using the PVE API.
Configuration Reference
Backup configuration is stored in /etc/wolfstack/backups.json. This file is managed automatically by the dashboard — you should not need to edit it manually, but it’s useful to know the structure for debugging.
{
  "schedules": [
    {
      "id": "uuid",
      "name": "Nightly full backup",
      "frequency": "daily",
      "time": "02:00",
      "retention": 7,
      "backup_all": true,
      "targets": [],
      "storage": {
        "type": "s3",
        "bucket": "my-backups",
        "region": "eu-west-1",
        "endpoint": "",
        "access_key": "AKIA...",
        "secret_key": "wJal..."
      },
      "enabled": true,
      "last_run": "2026-02-25T02:00:12+00:00"
    }
  ],
  "entries": [
    {
      "id": "uuid",
      "target": { "type": "docker", "name": "nginx-prod" },
      "storage": { "type": "local", "path": "/var/backups/wolfstack" },
      "filename": "docker-nginx-prod-20260225-020012.tar.gz",
      "size_bytes": 52428800,
      "created_at": "2026-02-25T02:00:12+00:00",
      "status": "completed",
      "error": "",
      "schedule_id": "uuid"
    }
  ]
}
PBS Configuration
PBS connection settings are saved separately at /etc/wolfstack/pbs-config.json:
{
  "pbs_server": "10.0.10.50",
  "pbs_datastore": "main",
  "pbs_user": "backup@pbs",
  "pbs_token_name": "wolfstack",
  "pbs_token_secret": "xxxxxxxx-xxxx-xxxx-xxxx-xxxxxxxxxxxx",
  "pbs_password": "",
  "pbs_fingerprint": "AB:CD:EF:...",
  "pbs_namespace": ""
}
Troubleshooting
PBS connection fails
- Verify
proxmox-backup-clientis working:proxmox-backup-client version(installed automatically by WolfStack setup) - Check that the PBS server is reachable:
curl -k https://your-pbs:8007/api2/json/version - For self-signed certificates, make sure you have the correct fingerprint
- Ensure the API token has DatastoreBackup and DatastoreReader roles on the datastore
Backup fails with “Docker commit failed”
- The container may have been removed between target listing and backup. Refresh and try again.
- Check Docker is running:
systemctl status docker
LXC backup fails or takes very long
- LXC containers are stopped briefly during backup for filesystem consistency. Very large containers may take time to tar.
- Ensure sufficient disk space in
/tmp/wolfstack-backups/(the staging directory).
Restored LXC container won’t start
- WolfStack automatically fixes the
lxc.rootfs.pathand setslxc.apparmor.profile = unconfinedduring restore. - Check the container config:
cat /var/lib/lxc/{name}/config - Verify ownership:
ls -la /var/lib/lxc/{name}/— should be owned by root.
S3 upload fails
- Verify credentials and bucket name. Ensure the IAM user has
s3:PutObjectpermission on the bucket. - For non-AWS providers (R2, MinIO), make sure the endpoint URL is correct.
Scheduled backup didn’t run
- Check the schedule is enabled (toggle switch on).
- WolfStack checks schedules every 60 seconds. If the time window was missed (e.g. server was down), it will run on the next check.
- Review logs:
journalctl -u wolfstack | grep -i backup
Disaster recovery: restore from a folder
The ordinary restore path assumes the backup is one WolfStack already knows about. Disaster recovery rarely looks like that — the original server is gone, and with it the record of what was ever backed up.
Restore from folder handles exactly that case. Point WolfStack at any folder a server can reach, and it scans for WolfStack backups and restores one there:
- Pick the target server — it does not have to be the machine the backup came from.
- Point at a folder — a local path, or a mounted S3/R2 bucket, or any other reachable mount.
- Choose from what it finds — the folder is scanned for Docker, LXC and VM backup archives.
- Restore, optionally under a new name — with restore-as-name and replace options.
That covers restoring to a different machine, from a different location, under a different name, with no surviving record of the original. Configuration backups are deliberately excluded from this path: they extract to the filesystem root and are not safe to restore from an arbitrary folder.
Choosing where local backups are written
“Local” backups are not tied to a fixed directory. Pick Local on the Backups page and an editable folder field appears inline, with a folder browser — so you can point backups at a mounted S3/R2 bucket, a NAS mount, or a second disk without a trip to Settings. Saving makes it the default for scheduled and one-off backups alike, and it is also exposed under Settings → File Locations.
One important detail: the concrete folder is recorded into each backup entry when the backup is written, not looked up at restore time. Changing the default later therefore never redirects an older restore to the wrong place — a restore always reads from exactly where that backup was actually written.