


Plugin System
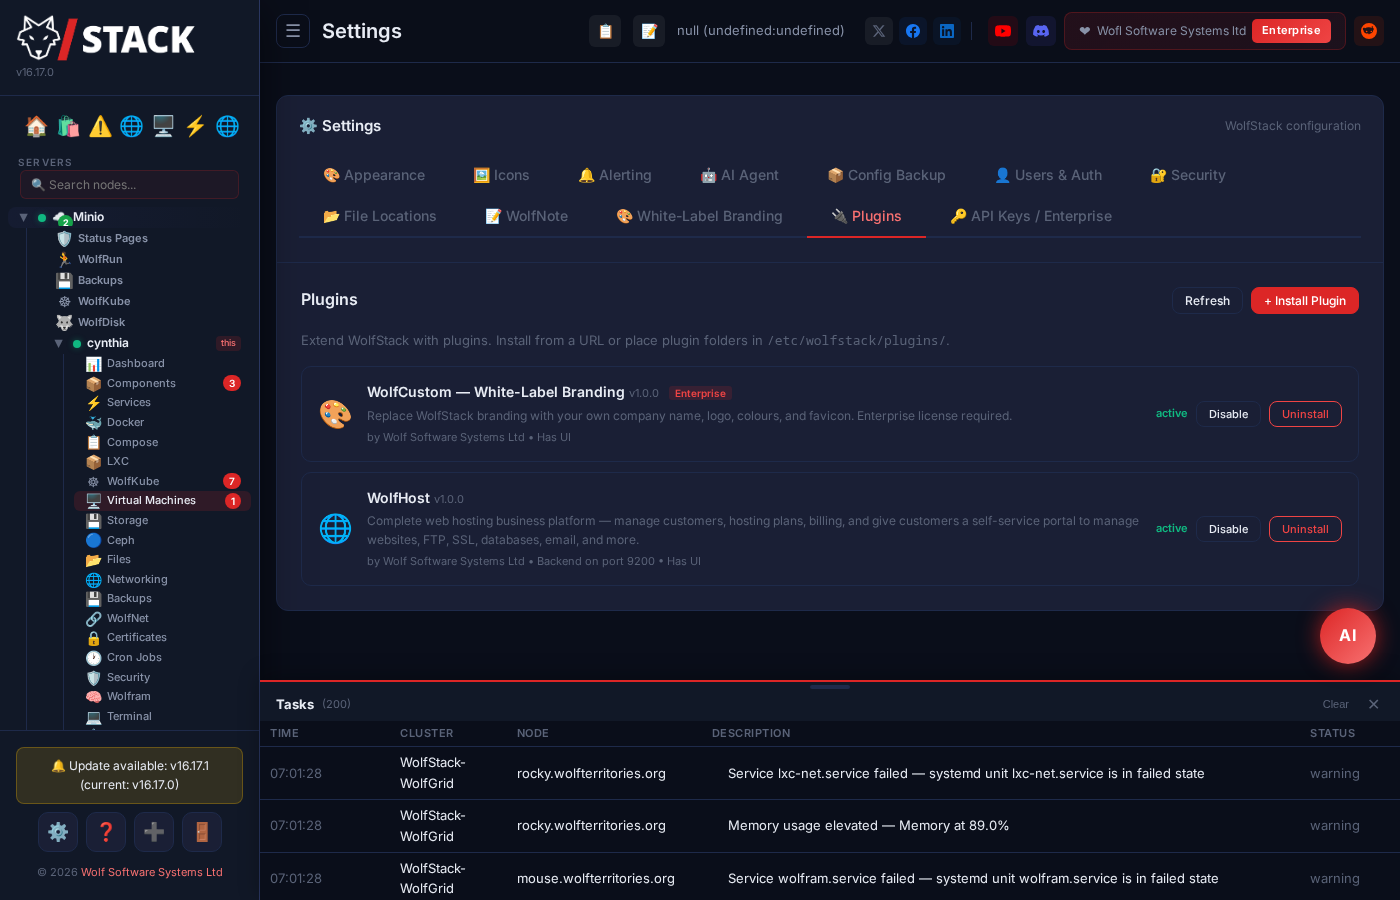
WolfStack’s plugin system lets you extend the platform with additional functionality. Plugins can add new pages to the UI, provide backend APIs, and integrate with WolfStack’s existing features.
Plugins are managed from Settings → Plugins in the WolfStack dashboard.
✨ Enterprise feature: The plugin system requires a WolfStack Enterprise license. Plugins are loaded, assets served, and backends proxied only when a valid license is present. Without a license, plugins in /etc/wolfstack/plugins/ are listed but marked requires_license and remain inactive.
How Plugins Work
A plugin is a directory inside /etc/wolfstack/plugins/ containing a manifest and optional frontend/backend code:
/etc/wolfstack/plugins/my-plugin/
  manifest.json      — plugin metadata and configuration
  web/
    plugin.js        — frontend code (injected into the SPA)
    plugin.css       — styles (optional)
  bin/
    handler          — backend binary (optional)
On startup, WolfStack scans the plugins directory and loads each valid manifest. Frontend assets (JS/CSS) are automatically injected into the web UI, and API requests are proxied to the plugin’s backend process.
Plugin Manifest
Every plugin must include a manifest.json file describing its metadata, menu placement, and capabilities:
{
  "id": "advanced-monitoring",
  "name": "Advanced Monitoring",
  "version": "1.0.0",
  "description": "Real-time metrics with Prometheus integration",
  "author": "IntelligentWolf Ltd",
  "icon": "📊",
  "enabled": true,
  "menu": {
    "section": "datacenter",
    "label": "Monitoring",
    "view": "monitoring"
  },
  "api_port": 9100,
  "settings": [
    {
      "id": "prometheus_url",
      "label": "Prometheus URL",
      "input_type": "text",
      "default": "http://localhost:9090",
      "description": "URL of your Prometheus instance"
    }
  ]
}| Field | Required | Description |
|---|---|---|
id | Yes | Unique plugin identifier (lowercase, hyphens allowed) |
name | Yes | Display name shown in the UI |
version | No | Semantic version (e.g. “1.2.3”) |
description | No | Short description of what the plugin does |
author | No | Plugin author or organisation |
icon | No | Emoji icon for the sidebar and plugin list |
enabled | No | Whether the plugin is active (default: true) |
menu | No | Navigation menu placement (see below) |
api_port | No | Port the plugin’s backend binary listens on (for API proxying) |
settings | No | Array of configurable settings shown in the plugin’s settings panel |
Menu Placement
The menu object controls where the plugin appears in the WolfStack sidebar navigation:
| Field | Description |
|---|---|
section | "datacenter" — appears in the datacenter-level navigation (visible to all nodes)"server" — appears under each server’s navigation"settings" — appears as a tab in the Settings page |
label | Text shown in the sidebar (e.g. “Monitoring”) |
view | View ID used internally — the plugin’s page container will be page-plugin-{view} |
Frontend Plugin (plugin.js)
If your plugin includes web/plugin.js, it will be automatically loaded when WolfStack starts. The script has full access to the WolfStack SPA’s DOM and JavaScript functions.
Your plugin’s page container is created automatically at page-plugin-{view}. Populate it in your JS:
// web/plugin.js — Example: Advanced Monitoring plugin

// This runs when the plugin is loaded
(function() {
    const container = document.getElementById('plugin-monitoring-content');
    if (!container) return;

    // Render your plugin UI
    container.innerHTML = `
        <div class="card">
            <div class="card-header"><h3>Advanced Monitoring</h3></div>
            <div class="card-body" id="monitoring-data">Loading...</div>
        </div>
    `;

    // Fetch data from plugin backend
    loadMonitoringData();
})();

async function loadMonitoringData() {
    const resp = await fetch('/api/plugins/advanced-monitoring/api/metrics');
    const data = await resp.json();
    document.getElementById('monitoring-data').innerHTML =
        '<pre>' + JSON.stringify(data, null, 2) + '</pre>';
}
Available WolfStack functions you can call from plugin JS:
showToast(message, type)— show a notification (type: ‘success’, ‘error’, ‘info’)apiUrl(path)— resolve an API URL (handles node proxying)escapeHtml(str)— HTML-escape a string for safe renderingformatBytes(n)— format bytes as human-readable (e.g. “4.2 GB”)selectView(view)— navigate to a datacenter-level pageselectServerView(nodeId, view)— navigate to a server-level page
Backend Plugin (bin/handler)
If your plugin needs server-side logic, include a backend binary at bin/handler. WolfStack will proxy API requests to it:
- Requests to
/api/plugins/{id}/api/*are forwarded tohttp://127.0.0.1:{api_port}/* - All HTTP methods (GET, POST, PUT, DELETE) are proxied
- Authentication is handled by WolfStack — only authenticated requests reach the plugin
- The backend receives
PORTandPLUGIN_DIRenvironment variables
The backend can be written in any language — it just needs to be a standalone HTTP server. Example in Python:
#!/usr/bin/env python3
# bin/handler — simple plugin backend
import os, json
from http.server import HTTPServer, BaseHTTPRequestHandler

PORT = int(os.environ.get('PORT', 9100))

class Handler(BaseHTTPRequestHandler):
    def do_GET(self):
        self.send_response(200)
        self.send_header('Content-Type', 'application/json')
        self.end_headers()
        self.wfile.write(json.dumps({"status": "ok"}).encode())

HTTPServer(('127.0.0.1', PORT), Handler).serve_forever()
Plugin Store
WolfStack includes a built-in Plugin Store accessible from Settings → Plugins → Plugin Store. Browse available plugins and install them with a single click — no manual downloads or file management required.
- One-click install — Select a plugin from the store and click Install. WolfStack downloads, extracts, and activates it automatically.
- Automatic updates — Reinstalling a plugin that is already installed automatically updates it. WolfStack stops the existing plugin process, replaces the files, and starts the new version.
- Currently available — The Plugin Store ships with WolfCustom (white-label branding). WolfHost (web hosting platform) is now built into WolfStack — no install needed.
Installing Plugins
Plugins can be installed in three ways:
From the Plugin Store
Go to Settings → Plugins → Plugin Store and click Install on any available plugin. This is the easiest method and handles everything automatically.
From the UI
Go to Settings → Plugins → Install Plugin and paste the URL of a .tar.gz archive containing the plugin directory. WolfStack downloads and extracts it automatically.
From the command line
# Download and extract to the plugins directory
curl -fsSL https://example.com/my-plugin.tar.gz | sudo tar xzf - -C /etc/wolfstack/plugins/

# Restart WolfStack to load the plugin
sudo systemctl restart wolfstack
Manual installation
# Create the plugin directory
sudo mkdir -p /etc/wolfstack/plugins/my-plugin

# Copy your plugin files
sudo cp manifest.json /etc/wolfstack/plugins/my-plugin/
sudo cp -r web/ /etc/wolfstack/plugins/my-plugin/
sudo cp -r bin/ /etc/wolfstack/plugins/my-plugin/

# Restart
sudo systemctl restart wolfstack
Managing Plugins
From Settings → Plugins you can:
- Enable/Disable — toggle a plugin on or off without uninstalling it
- Uninstall — remove the plugin and all its files
- Refresh — rescan the plugins directory for new or changed plugins
Plugin status indicators:
- active — plugin is loaded and running
- disabled — plugin is installed but not active
- requires_license — enterprise-only plugin, needs a valid license
- error — plugin failed to load (check manifest.json)
Enterprise License Required
The plugin system as a whole is an Enterprise feature. All plugins — first-party or third-party — require a valid WolfStack Enterprise license to load.
Without a license, plugins dropped into /etc/wolfstack/plugins/ are still listed in Settings → Plugins, but their status is shown as requires_license and they remain inactive:
- Plugin frontend JS and CSS are not served
- Backend handler proxies return
403 Forbidden - Plugin menu entries do not appear in the sidebar
- Plugin installation via URL is blocked
See Enterprise Licensing for details on obtaining a license. This gating allows the WolfStack core to remain fully open-source while protecting the plugin ecosystem as part of the Enterprise offering.
Plugin API Reference
| Method | Endpoint | Description |
|---|---|---|
GET | /api/plugins | List all installed plugins with status |
POST | /api/plugins/install | Install a plugin from a URL |
POST | /api/plugins/reload | Rescan the plugins directory |
DELETE | /api/plugins/{id} | Uninstall a plugin |
POST | /api/plugins/{id}/toggle | Enable or disable a plugin |
GET | /api/plugins/{id}/file/{path} | Serve plugin web assets (JS, CSS, images) |
* | /api/plugins/{id}/api/{path} | Proxy requests to the plugin’s backend |
GET | /api/plugins/{id}/data/config | Read plugin config JSON from data directory |
POST | /api/plugins/{id}/data/config | Write plugin config JSON to data directory |
POST | /api/plugins/{id}/data/upload/{file} | Upload a file to the plugin’s data directory |
GET | /api/plugins/{id}/data/file/{file} | Serve an uploaded file from the plugin’s data directory |
The /data/ endpoints allow plugins to store configuration and uploaded files (logos, images) in /etc/wolfstack/plugins/{id}/data/ without needing a backend binary.
Available Plugins
Official plugins developed by IntelligentWolf Ltd: